Week 1
Introduction to Nuke
Basic exercises to get introduced to Nuke itself, what it is used mostly.


Compositing
Putting a few aspects to create a full image

Week 3
Complex roto
The task was to roto the hand out of video

Here is the graph for this task. The video attached to copy nod (B) and copy nod connected to roto nod (A).

Here is my roto window settings. To roto the hand out I used Bezier and BSpline, mostly the following one as it is much more flexible.
Keyframes

It is important to keep the figures organised, as seen on the right, the BSplines are categorised to different fingers. Optional, but you can change the colours as well for each item as seen below. I made one finger violet other green.

This filter helps to see more accurate outlines of my selected roto

This is what I have done during the lecture, there is some mistakes in some frames
Week 4
Basic Keying
Premult Node
My task was to change the sky in an image and ensure that the trees blend in well

Original image

The sky

The outcome

This is the scheme for the exercise.
-
Starting with a Keyer luminance, looking into alpha channels and adjusting settings.
-
Then comes in Roto, I selected the whole sky and top of the trees. Merged over.
-
Roto out a small white shadow in the corner. Merged as stencil.
-
Now it was time to Merge over the desired sky image.
-
•The Premult node multiplies the RGB layers by the alpha layer. With the result that transparency becomes visible in the viewer.
-
Now time to clean up sharp edges with Blur and Lightwrap
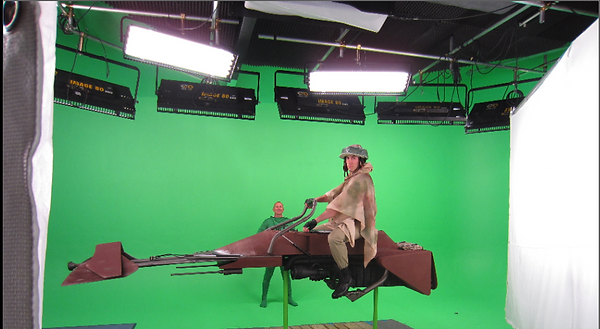
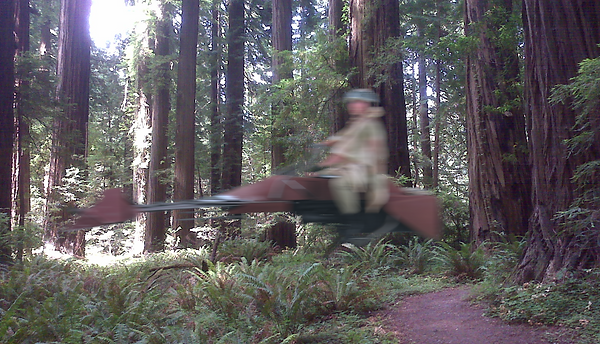
Green screen exercise


The task was to insert moving woman into still background.
-
Time to add keylight and select green colour as we are going to change the green colour to an image.
-
Next keylight is called Garbage key, with whom I roto out the whole image except the woman.
-
Filter erode is for keeping more fine hair details of the woman.
-
Time to merge everything.
The final outcome
Week 5
Advanced Keying
The task was to use Keylight to keep Alice with enough fine details and remove the various green screen aspects.

Original image
Image Alpha channels after keying, it is clearly seen that the right side of the background green screen shows no values

Merged Constant over the keyed area

Node graph for this task

This scheme shows the whole keying process step by step.
-
To image I added Denoise and connected through Source pipe.
-
Next, started to key out the shades of green. For first Keylight I selected the green area around Alice's left hair and played around with screen mate to achieve best results in Alpha channel. Then added the first Keymix and roto out the hair where I selected the green in Keylight.
-
I repeated the steps a few times to get detailed and precised results around Alice's head and her left arm.
-
The merge (stencil) and the roto next to it was the garbage matt
-
Now the Copy (shortcut K) node connects the whole process with the image.
-
Added premult and merged a constant to see what has been removed.
Week 6
Tracking in Nuke
First exercise was to track a red sign in the shot so that sign on its left would be blurred

The tracker position

Set frame to 1001 (start frame) plus change the transform to match-move 1-pt

The tracker, just transform is selected

The Node graph for this scene. We added just the tracker because the Roto to hide the sign was pre-made. Our task was to make the Roto follow in the scene.
BEFORE
AFTER
2nd excercise

Second task was to create trackers for two buildings, here are the trackers shown on the right.

Its important to choose match-move transform and set frame.
Here are the tracker names and the difference between these 2 images is the T and R settings, if you want your tracker to be as accurate as possible, you have to choose the R setting. It allows the tracker rotate around .


This is the graph of the exercise with just the first tracker.
The tracker
It is quite accurate, it follows the building and rotates as the footage rotates.
3rd excercise
The third task was to track vehicle's windscreen. This was more complex than the buildings before, as the glass is larger and moves more.
Made the Roto, and then made an absolute baked CornerPin


Here is the tracking of every Roto point.

The final result
I made it violet so it could be seen
Week 9
Cleanup and patch repair

For this week class we are doing clean up and patch repairs. Our task was to remove to old man walking from the sequence.


To start off rotoscoped out the square where there is no man. Used framehold and premult it all. But now we have a problem.
The woman walks up to the patch and disappears under it. We have to fix that.


That's where the tracker comes in handy.
We use it and add multiply. Now the patch will go away when the women comes near by.
Before
After
Week 10
Complex Cleanup
Exercise 1

For this exercise our task was to remove the group of people in the sequence.
Main technique I used was to Roto and track creating a Corner Pin relative baked, then Roto paint the people on one frame and after use Frame hold and connect the corner pin.
After merging that would make the painted on top frame to stick in one place and give the look of empty space

Here we added some grade so that the painted frame hold would match the scene
Before
After
Exercise 2

For this task we were given a footage of floating boats at a dock and we were given a task to remove one boat and a rope.
This task was a bit complex to me. I didn't manage to make it seamless nor close to seamless. It was difficult as the water shade and movement were various. A bit more practice should work.


Before
Here is before and after of the footage.
The rope closer to the rock was more complex to remove and the top part of the boat was a challenge.
As shown in Node graph above, I did a few Roto's to achieve this result.
After
Week 11
Advanced Cleanup

This week's task was to seamlessly remove the logo from a box.
1st step is always to Roto out and create a corner pin relative baked logo sized shape, a square for this example.
After that Roto paint the logo out in one frame and create a Frame hold.
Don't forget to add Premult to the Node graph
Final step, as always, Merge over.

To make the removed logo seamless we have to grade it as the lighting is not always the same so we have to adjust the colour of the patch in almost each frame with keyframes
Other thing to do, there was a shadow falling on the logo which looking at this stage looks funny, so we have to make a new shadow matching as before. For that roto the shadow area and grade it to make it look as a shadow.
At one point of the video an arm appears on the logo, so now we just cut the arm off and it looks funny as well. To make it seamless I roto out that part and blured a bit and merged as a stencil.
Final step, merge over everything.
Node graph

BEFORE
AFTER
The test
During this module we learnt how to do one thing or another in a footage, various cleanups, green screen and colour grading. Therefore we had a little test to show learning progress.
Here is a screen grab of the footage that we had to work with and had to do as many steps as possible.
Tasks: Remove the pink markers, remove the logo from suitcase, add colour bars to the tv screen and change the green screen colour.
Sounds quite basic but a few things gives it a challenge:
- two markers are/will be covered by the guy walking
- the guy walks by the tv screen with his suitcase

Final Node graph

Walkthrough of how I did it
I started off by changing the green screen, then removing the logo, then pink markers and finally the tv screen. I managed to do everything in under 6 hours in total.
For green screen I did 2 keylights to get more accurate results.
The logo removal was one of the easiest tasks except the grading part! It took me very long to grade it somewhat right. It's one of the things that I didn't do completely seamless, during some movement the patch doesn't always match with the whole suitcase. Other than that everything was standard as in previous weeks.
The pink letters were easy where they are untouched and don't move, those I just roto painted. However the two which are touched or covered by the man were a challenge. I was using a tracker but also doing manually a lot, frame by frame for the best result. That took me a while
And lastly the tv screen, It wasn't that bad, I choose a random image of colour bars from google and transformed, graded, saturated and defocused a bit to match the scene. The guy passing was easy, just had him Roto out in every other frame and merged as stencil. However, I didn't manage to catch shadows that previously were in the scene.