Character Animation
Week 1
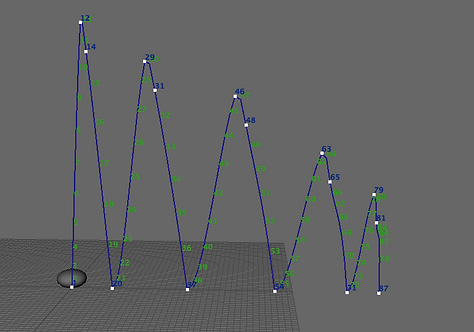


First attempts in basic animation - bouncy ball. Bouncing in Y axes and moving in X axes. Animation Graph editor below

Week 3
Lattice deformer
'Sack of flour'
Using keyframes (S key) to make basic animation
Week 4
Inverse Kinematics
In today's session we were learning about character control by creating parent child relationships to build a simple rig.
Firstly, I built a funny looking object from basic rectangles (picture 1). Secondly, I assigned joints and created IK handle, so that joints would connect (picture 2).
Buttons in Maya to create joints and IK handles

Picture 1

Picture 2

Outliner of my object
Here we can see that we have a few parent and children connected. The cube is the whole object and it has two legs (two joints). Two legs has their own handles.
In today's lecture we were focusing on character posing, emotions and head turn.
We were a given Eleven Rig, a modeled and textured boy which has various movement joints.
Our task was to create series of poses that shows different emotions.


Curious
Sitting and smiling

Upset

Excited

Posing with one leg folded
Week 6
Walk
Today's lecture was about creating walk cycle, using rigged character from last week. Customised characters features such as gender, eye colour, body shape.
Here is more improved character movement. Using layers to make the feet tilt, head tilt, blink and move eyes.

`These are my layers for this animation
Assignment 1
Basic Weight Mechanics
The task was to show basic keyframe animation skills and weight mechanics of a bouncing ball.

Maya scene

Short breakdown of the process:
-
Opened new scene and set project.
-
Added the first ball to the scene.
-
Using keyframes (S) animated the ball by changing its location (W) and size (R).
-
The ball was moving up and down and stretching while moving.
-
Added second larger ball and repeated steps.
-
Added a flat surface to the scene.
-
Added a camera and adjusted a right angle to show both balls.
-
Since I had free time, I decided to add materials to balls and make them colourful and shiny.
-
For material I used Arnold standard surface and selected car paint and choose colours.
-
Adjusted render settings, choose PNG image and selected HD_1080 quality.
-
Rendered the whole sequence.
-
Transferred rendered images to another program and created the final animation.
Camera view
Keyframes of the blue ball
For animation I used 25 frames per second
Playblast
The final render
Lifting weights

I made her blink, move both hands and her body as well as her head turning and tilting. I focused on fingers and tried to make them relaxed.
For this project I wanted to make Eleven come and pick up a cardboard box.
Using keyframes I moved several parts of her body to make it look as smooth as possible


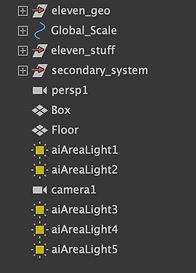
My outliner shows Eleven, Floor&walls and a few area lights for render

Here I'm showing smooth walking that I did, besides moving the legs forward I tilted her feet as well for smoother finish
My box has a AiStandardsurface material and I put on an image through colour ->File of cardboard material


Render sequence of Eleven walking and picking up a box
Playing with ball

I did an animation of Eleven playing with a ball. Here is the camera's point of view.

This is the scene itself, I built some panels around to make an environment and added lights. I had a few light white lights and two colorful lights - pink and blue.
The ball is just a basic shape with shiny material on it
Render sequence
For this assignment I started by looking through many previous 11s competition audio clips, hoping to hear one and imagine my own idea and render sequence in my head.
I listened to many of them and in the end I chose 2015 May's competition sound "I'm right!"


My next step was to choose a rig. I saw that in the 11s Club Resources page there are a few rigs to choose from and decided not to use the Eleven rig because I have found Max Rig!
I thought it would be a nice change from Eleven, a little challenge!
In fact, Max has a little different movement than Eleven. His joint movements are based only on rotation (R) points
Max Rig examples
Mood board
Looking for inspiration
In my mind I was thinking to have Max in a lovely vintage cafe to sit in front of a table and as if he's having a one on one conversation and camera would be like the other person's view.
Here is my inspirational pictures of environment


The modeling
To create my desired environment I decided to get a little list of what I essentially have to model.
Started of with the table, I built it mainly just from a thin flat rectangle. Extruded it out, and beveled some of the edges.
Secondly, I did the chair, started of with some ovals as the main parts of the model and added tubes to assemble the chair legs and a stretched out sem-circle for the back rest to connect with the lower chair.
Then I modelled the lamps, it was pretty straight forward as well. Getting a semi circle, extruding and etc.
After modelling, I added the textures to my furniture. For the metal chair legs and table stove I have chosen aiStandardsurface and choose metal material and selected a colour of my preference.
For the table's top , walls, paintings and floor I did several materials of AiStandard surface and choose Colour > File. Added different material images and adjusted them with UV planar settings.
After duplicating furniture and assembling a scene, I made Max rig sit down on one of the chairs, configured with lights, added a camera and began to animate.

Table material image

Lamp material in Hypershade

Table material in Hypershade

Floor material in Hypershade
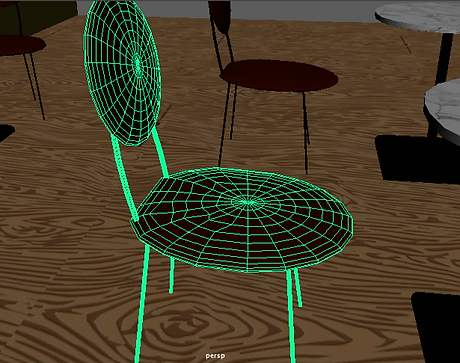
Chair model

Table model
Rendered images of finished environment

View from further camera view

View from above

Close up of interior
Animation
To start of I made sure everything adds up technically:
Imported the chosen audio
selected 25 fps
For an 11 s video that makes 275 frames in total
Now I could begin the animating
Frame set

Imported audio

I began by animating Max's facial expressions.
His script included him saying a few sentences about how he "knows that he's right".
The phrase "I know I'm right" consists of various opened and closed mouth positions, wide I's and narrowed O.
After I have made his mouth look like he's genuinely saying his words, I moved on to body movements, eyebrow lifts, head turns, hand movement, neck moving back and forth, as well as blinking. Luckily, Max didn't have to walk for my animation since it already took me quite a while to make him look like he's saying his script and look as natural as I can get him look.
Keyframes
And it's time to render sequence! My render process took roughly 4 hours and after I realised it has been rendered as an unknown file...
Before rendering didn't double check my render settings where I would have seen that besides rendering into jpeg it was automatically chosen as some other file type that didn't open neither in Mac or Windows... So had to do it again.
This time just be sure I don't waste 4 hours, I rendered just first three frames of the sequence, saw that it's rendering as jpeg and then choose to render the whole sequence.
My 11s animation
After rendering my next step was to upload the render sequence into Final Cut Pro X. I use to make my images into a little movie as I don't own Premier Pro at home. Added the sound, exported as a master file and here it is. My little animation. I am happy how the facial expressions and talking came out, however, I could have done something better with the arms, looks a it awkward. Other than that, I'm happy with it.


