Introduction to Mocap
During this lesson we spent the first hour or so in the green screen room and got introduced to Vicon Setup. The main steps to set up Mocap are:
-
Marker placement
-
Set Vicon settings
-
Camera callibration
-
Masking
-
Wand wave
-
Set origin
-
Set floor plane
-
Save camera calibration
-
Wand calibration
-
Actor calibration
-

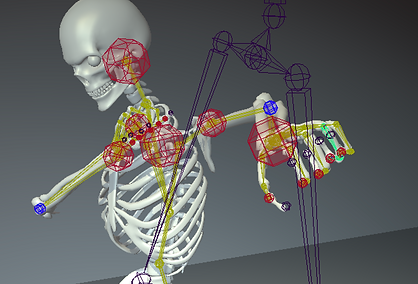
Here is an example of what mo cap footage from Shogun Post looks like in Maya.
We get a rig with movement and later on this could be baked onto a 3d model.
Maya HIK Retargeting and edit
For this weeks class we learnt how to assign the Mocap data to a 3D object.
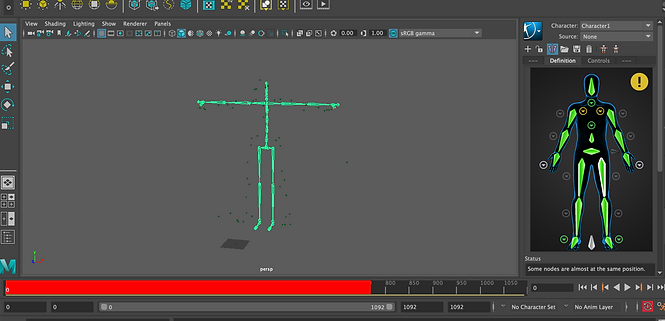
The first step was to import FBX Mocap file and open HumanIK window.
Next, open script editor and run a MEL script which puts Mocap skeleton in t-pose and created a new HIK Character Definition with hips. Then in Human IK window I pressed a small folder icon to load skeleton definition and later on locked the settings by pressing the lock next to folder button.
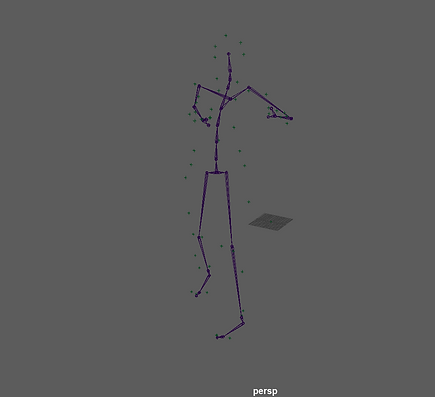
After that I manually characterised rig by selecting the joints and assigning it to bones.

The next step after setting up the Mocap rig was to import the 3d skeleton object and and pick the character that we are working with and choose the source which drives the animation in the HumanIK window.
The outcome is our skeleton moving by Mocap information.
Playblast
HIK Rig
Cleanup and Editing
Hip Rotation
Often times Mocap data will have minor issues caused by things like marker occlusion during capture or differences between the data and character, however that can be easily fixed in Maya

For instance,
our skeleton model has incorrectly aligned hips which causes the twitches during the sequence.


Sollution to this is a AnimLayer (select all rig elements>Layer>Create layer from selected), turn on HIK Pinning for knees and upper torso to lock position. Lastly, rotate and key the hips at frame 00 with another layer.

Human IK
Animation layer
Rotated hips
Human IK
Fixed problem
Finger poses
There was a problem with our rig's fingers as it wasn't captured by mocap system so in animation layers you have to enable hand pose layer


Assignment 01
Motion Capture Shoot
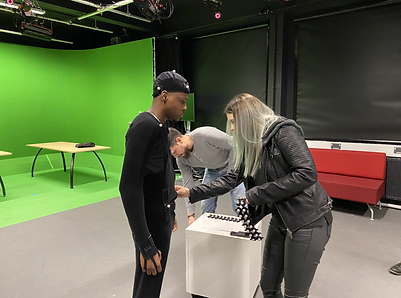
Vicon mocap filming session
First step in mocap progress is marker placement on the suit by using 53-Marker set as it is the standard Vicon FrontWaist setup .
Second step is to set up the Vicon software, creating a new session and adding 4 separate sessions to it (CAL, ROM, AM, PM)

Next step - camera calibration
Walk around the mask area and wave the wand in 8's. Yous should see red dots in Vicon.


Next step - Subject (actor) calibration.
In order to calibrate the actor he has to perform range of motions for the software.
And the final step is filming! During our session we shared our ideas and one of our classmate tried to play various scenes, from ballet to moonwalk to driving a car and many more. The filming session was loads of fun.
Assignment 01
Maya HIK Retargeting
To begin with I brought the Mocap fbx file as well as my model. I choose a lego figure in the beginning of my assignment process, however, later on due to weird rigging I changed my model.
Next step to open Human Ik window and Windows>Script editor and run a T pose script.

Project outliner

After getting the Mocap into a T-pose we I loaded character definition and locked by pressing the lock button in Human IK window.


It was time to move to my 3d model

My lego man wasn't rigged, therefore, I made him a Quick Rig


After connecting source my lego man was walking by the mocap footage, however, he was weirdly stretching out. I couldn't find a fix, therefore, I redid it on a bit better and more human like model
Assignment 01
Maya HIK Retargeting
Take 2
As I started all over again, I followed same retargeting steps as before: loaded MEL script, put Mocap rig in T-Pose, loaded HIK character definition by pressing the folder in Human IK settings
After those steps it's important to press the lock button below the blue button.


Did a Quick Rig on my new model as well by choosing One-Click and Auto-Rig
It creates a automatic rig for the model and it is quite accurate.

In Human IK make sure to set character to the quick rig you just made and source to Mocap HIK character definition


Unfortunately I had another problem and, I believe, it had to do with Vicon file itself, the left arm was completely off. I had to change my mocap footage which meant I would have to redo retargeting again.

My second Mocap footage choice was a ballet dance, after redoing every retargeting step again and connnecting mocap with 3d model in Human IK I finally made it work. Here is a little render of my 3d model doing one of the moves from ballet dance
A playblast of the mocap footage put on the zombie model
To make render a bit more interesting, I added a SkyDome light and added a 2k HDRI haven image and adjusted the render settings a bit
A couple of still render shots
I rendered my sequence in jpeg format and I rendered 1795 shots, took quite a few hours.


The last step was importing the render sequence into Final Cut Pro and making it into H.264 format video. I added a color board as well and adjusted the exposure and colour settings a little bit

Final render sequence
MoCap clip blending with Maya Time Editor
Started off by adding a mocap fbx into the scene and opened up the Time Editor and trimed the footage to use the part that I only need
Then I added another animation clip into the editor and also trimmed it.
To connect the mocap footage I selected the second clip and selected match relocators, to make the transition even smoother I dragged the clip over the first one


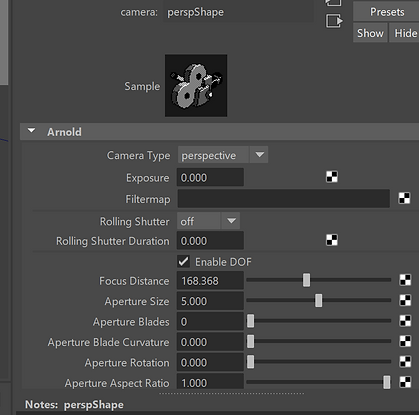
Depth of field
Did a little exercise to practise depth of field in Arnold rendering.
In order to have depth of field for the object I had to find out object's distance from camera by
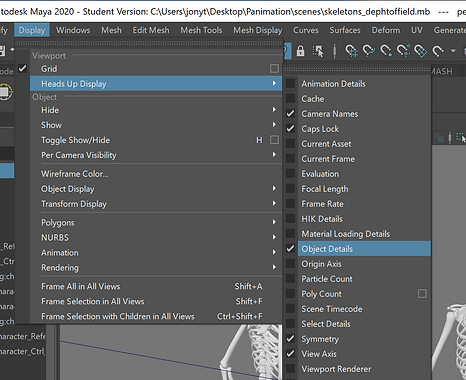
I added a plane with Arnold shadow matte material, skydome light and directional light to have some shadows

Render with no depth of field

Selected the perpective camera, scrolled down to Arnold and typed the focus distance from the object to camera, ticked enable DOF and Aperture size increases or decreases the amount of depth

Results of DOF


Camera Sequencer Workflow
We remembered from last year the camera shots and framing. A little guide sheet explaining multiple shots available


One of the camera sequence workflows is to create a single shot, cut into multiple pieces and assign different cameras which I did. I used for cameras and also added some animation to two of them to create a zoom out and a dolly.
Assignment
I started off by combining tghe desired mocap clips in time editor, trimmed and put them in desired order, to make the transitions smooth I used match relocations.
Then I imported my model from the previous assignment and matched him with the mocap footage. Added a skydome light, added a 4k hdri raven image, plane with Ai shaddow matte material and a directional light for a shadow.

Here I have a workflow of the camera shots that I did in the camera sequencer
Here is the final camera sequence, I used 9 cameras and did some medium, long shots, tilts, close ups.
After that it was time to render the sequence, I tried doing the layers, however, when I would made a layer and change render from masterlayer to new layer my model and the plane would dissapear. It seem very confusing so I did it manually and rendered each camera's sequence separetely. The rendering process took a while.
Some still renders


Put the render sequence into after effects, did adjust colours, brightness and contrast a little bit.